PLOSSYS Administrator
PLOSSYS Administrator is the Web user interface for administrating the Output Engine printers and jobs.
Requirements
Supported Web Browsers
The current versions of the following Web browsers are supported:
-
Microsoft Edge (on Windows)
-
Mozilla Firefox
-
Google Chrome
Configuration
Information on how to configure PLOSSYS Administrator can be found in the configuration sections of this documentation:
-
Configure the PLOSSYS Administrator Environment on Windows and Linux
mandatory
-
Permissions and OIDC Roles on Windows and Linux
mandatory, define which printer and job operations in PLOSSYS are users permitted in PLOSSYS Administrator
-
recommended, secure the user interface via SSL
-
Configure Languages and Texts on Windows and Linux
optional, add a new language or change specific texts in an existent language
-
Configure the Pagination on Windows and Linux
optional, define how many list items can be displayed per page
-
Additional Columns on Windows and Linux
optional, define which printer and job data are displayed as additional columns
Open PLOSSYS Administrator
-
To open the user interface, PLOSSYS Administrator, enter the following address into a Web browser:
https://<plossys_server>:9000 -
Use the user and password provided by your OIDC identity provider to log on to PLOSSYS Administrator.
Hint - Keycloak from SEAL Systems
If you are using the preconfigured Keycloak identity provider from SEAL Systems, you find the preconfigured users and their passwords in the SEAL Interfaces for OIDC documentation.
Troubleshooting
In case of problems, check out the troubleshooting section regarding PLOSSYS Administrator of this documentation.
User Interface
As of PLOSSYS Output Engine 7.2.0, the user interface of PLOSSYS Administrator has changed.
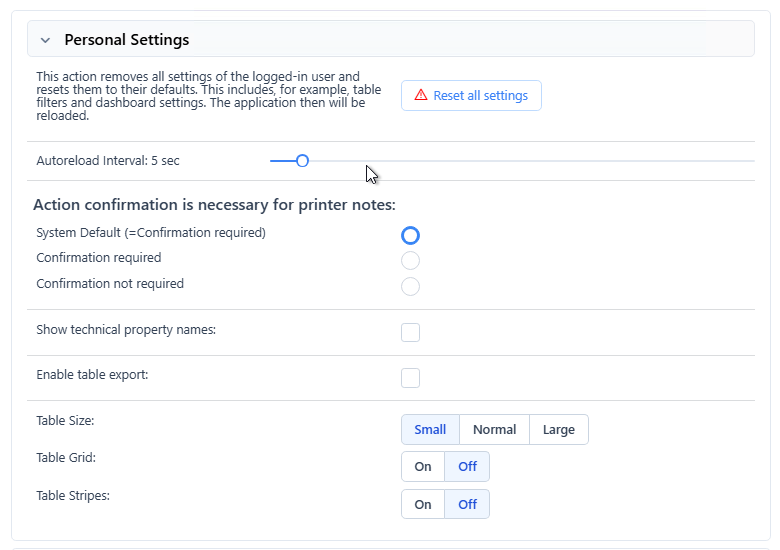
User Settings
User settings can be accessed at the top left burger menu of PLOSSYS Administrator, see Header, 1. Here you can, for example, enable the CSV export, change the auto reload intervall and the table grid display.
Header

Legend:
- Shows the current logged-on user. Drop-down menu with access to
User SettingsandLog Outoption. - Access to
Jobstab,Printerstab andDashboard. - Switch for dark/light mode and color options for the user interface.
- Language switch. By default English, German and French are available. Additional languages can be added, refer to Configure Languages and Texts for Windows or Linux.
- Current open tab.
- Columns shown in the user interface can be selected by the user. The selection pool of available columns can be modified via
JOBS_METADATAandPRINTERS_METADATAfor all users, refer to Configure Additional Columns or Linux. - Creates a
Watchtab with the currently applied filters. - Deletes all filters.
- Search box. The search is executed while you are typing.
- Exports the table with the currently displayed items and columns to CSV format. The button has to be enabled in the User Settings.
- Reload content manually.
Auto Reloadoption. When activated and the tab is the active one, its content is automatically refreshed. You can set the autoreload intervall in the User Settings.- Selects all entries on the current tab. Single entries can be selected via mouse click or shift click for several specific ones. The selection of multiple entries enables bulk actions.
Jobs Tab
The Jobs tab shows all jobs processed by PLOSSYS Administrator if they have not been deleted.
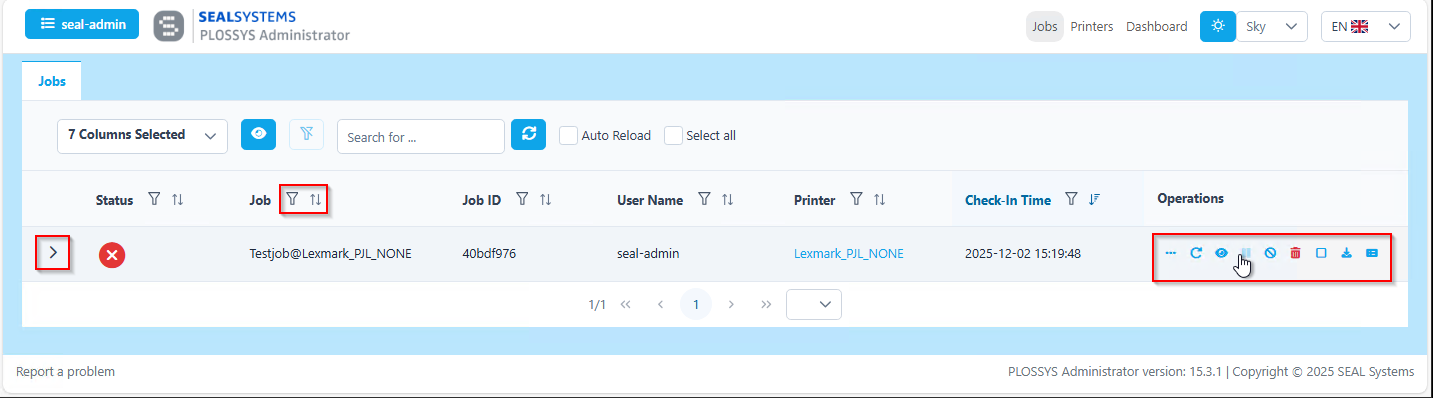
Columns can be used for sorting and filtering with the adjacent control buttons. You can drag, drop and resize the columns. The settings are retained even after a refresh. If a column is dragged so small that the controls are no longer visible, it will be rescaled after a refresh so that the elements can be used again.
By clicking the > on the left of each job, you can see the job parameters.
In the Operations column you find several shortcuts. They become visible, if you hover with your mouse over the area. If a symbol is not shown to you, your user rights are not sufficient for the respective action.
Legend:
-
 Opens the context menu for the job. You can also access the context menu by right-clicking on the job directly.
 -
 Repeats the job.
 -
 Creates a
 Watchtab for the specific job. -
 Pauses the job.
 -
 Cancels the job.
 -
 Deletes the job.
 -
 Checkbox. Saves temporary files for the job into the database if activated.
 -
 Creates a ZIP file with all the job data and downloads it.
 -
 Shows the job log for the specific job.
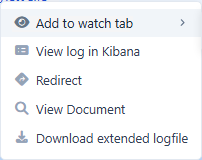
By right-clicking a job you can access the context menu, as shown below. Via the context menue you can create watch tabs, view the job log in Kibana, redirect a job, view the job document or download the extended log file.
Printers Tab
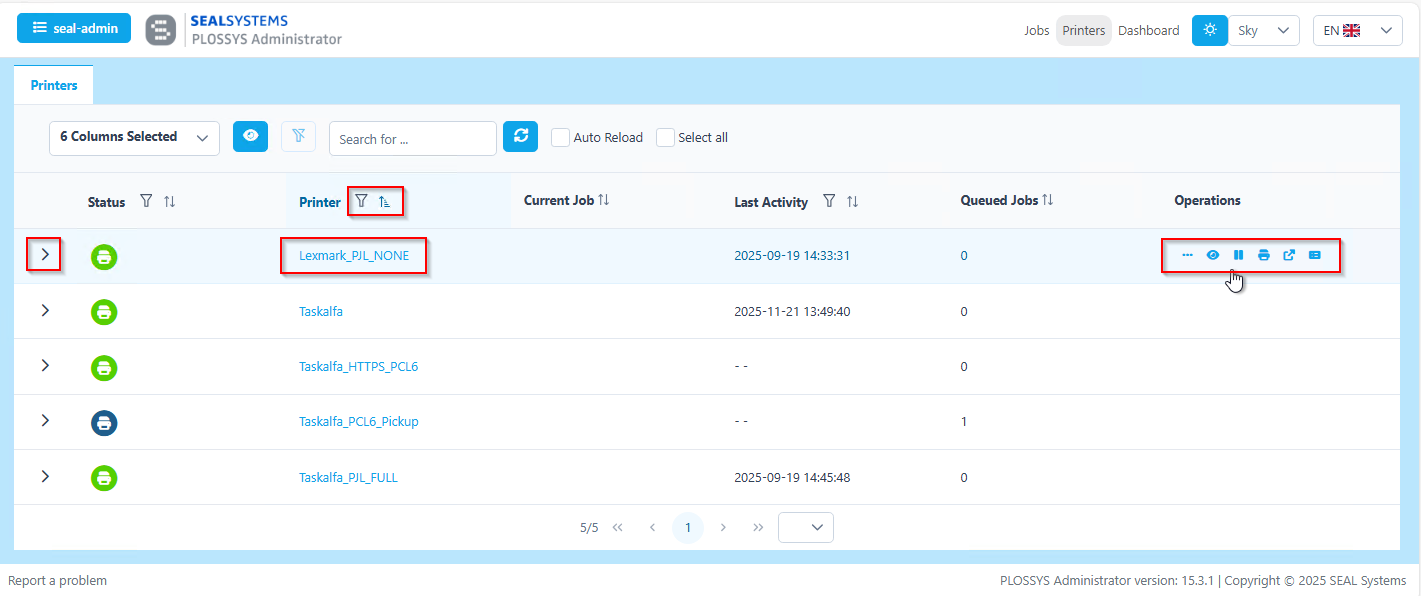
Columns can be used for sorting and filtering with the adjacent control buttons. You can drag, drop and resize the columns. The settings are retained even after a refresh. If a column is dragged so small that the controls are no longer visible, it will be rescaled after a refresh so that the elements can be used again.
By clicking the > on the left of each printer, you can see the printer configuration and parameters.
By clicking a printer name a new tab is opened with just the jobs for that printer.
In the Operations column you find several shortcuts. They become visible, if you hover with your mouse over the area. If a symbol is not shown to you, your user rights are not sufficient for the respective action.
Legend:
-
Opens the context menu for the printer. You can also access the context menu by right-clicking on the job directly.
-
Creates a
Watchtab for the specific printer. -
Pauses the printer.
-
 Starts a test print on that printer.
 -
 Opens the URL for that printer.
 -
Shows the printer log for the specific printer.
By right-clicking a job you can access the context menu, as shown below. Via the context menue you can create watch tabs, view the printer log in Kibana, redirect a printer or remove its redirection, manage printer notes, update and show the device state.
Hint - printer notes
Whether printer notes are displayed before printer actions is defined by the environment key PRINTER_NOTE_ACTION_CONFIRMATION and the respective user's settings, see User Settings.
If note confirmation is actived, the note is displayed even if the note column is not visible. You can display the note column via the column drop-down menu on the top left.
Creator and creation date of a note are visible if your mouse hovers over the note.
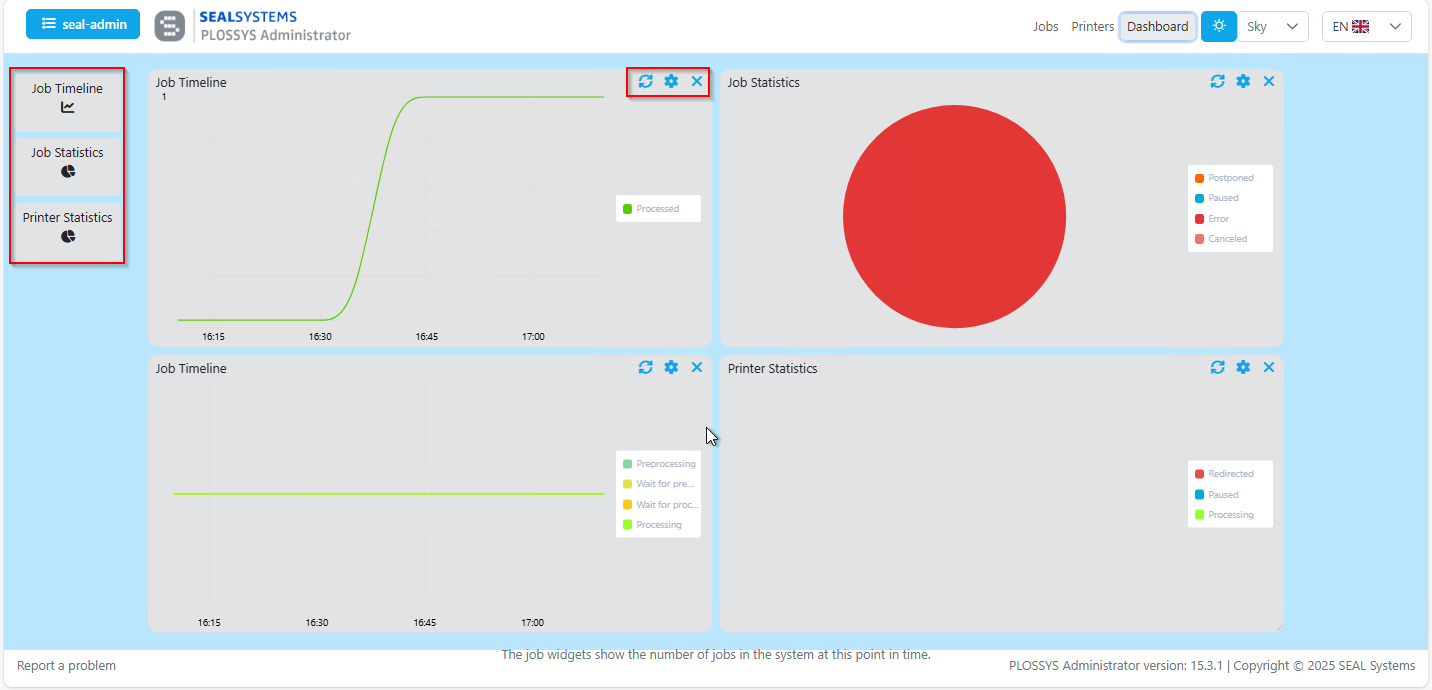
Dashboard
You can refresh, configure and remove each widget on the dashboard with the controls in the top right corner of it. You can add widgets by clicking the specific icon in the left column. The widgets only show statistics for the data available in the Jobs und Printers tabs of PLOSSYS Administrator at the same time. For deeper insights, use the Kibana dashboards of Elastic Stack.
Footer

Legend:
- In the drop-down menu, you can select how many entries are shown per page in the
Jobs,PrintersandWatchtabs. The available options can be set using thePAGINATION_STEPSenvironment key. The default value is defined byPAGINATION_DEFAULT_STEP. - Via
Report a Problemyou can reach the SEAL Systems Service & Support Center. - When reporting problems, please include the version of PLOSSYS Administrator you are using as shown here.